# Create and Test Microflow Service

In this section, you will create and test a **Microflow Service** that retrieves benefit data from the database created in the previous step.\
This Microflow will later be integrated with the mobile UI to display dynamic data at runtime.

The Microflow created in this tutorial is named **`Retrieve_Benefits`**.

***

### Objective

By completing this section, you will learn how to:

* Create a Microflow component in ONEWEB AppSpace
* Define **Input and Output Business Objects (BO)**
* Configure a **Database Activity Node**
* Map input and output parameters
* Test the Microflow using **Simulation Test**

***

### Step 1: Create Microflow Component

1. Log in to the **ONEWEB platform** using your credentials
2. You will be redirected to the **ONEWEB AppSpace** home page
3. Select your **Application Project**
4. Under **Components**, select **Microflow**
5. Click **Create Flows** (as shown in Figure 1)
6. In the configuration slider:
   * Enter **Component Name**: `Retrieve_Benefits`
   * (Optional) Provide a description
7. Click **Start Design**

<figure><img src="https://2015371994-files.gitbook.io/~/files/v0/b/gitbook-x-prod.appspot.com/o/spaces%2FMpDjHWFRUtZ5nJcSfVXd%2Fuploads%2Fd8pZYjq1YO5kMggf2Hjz%2Fimage.png?alt=media&#x26;token=d1fd2bc1-5591-4e8b-ade9-a4a2affbb3ff" alt=""><figcaption></figcaption></figure>

<p align="center"><em>
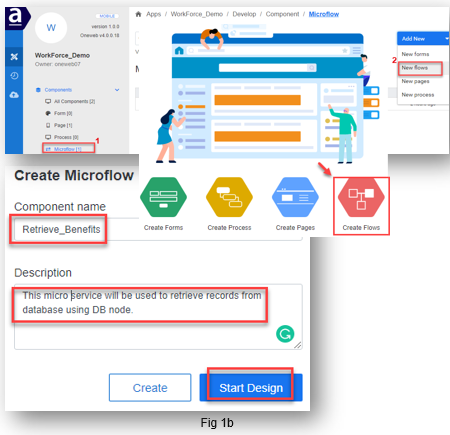
Microflow creation screen example</em></p>

***

### Step 2: Create Input Business Object

1. Open the **Business Object** tab
2. Select **Input Process Parameter**
3. Click **Add Parameter**
4. In the Parameter Form:
   * **Parameter Name**: `BenefitBOin_[yourname]`
   * **Parameter Type**: `Object`
5. Click **Submit**

> **Note**\
> Business Object names must be unique. Always include a unique suffix (e.g. your name).

<figure><img src="https://2015371994-files.gitbook.io/~/files/v0/b/gitbook-x-prod.appspot.com/o/spaces%2FMpDjHWFRUtZ5nJcSfVXd%2Fuploads%2FWfkWpC90q0HDhlQ94yfw%2Fimage.png?alt=media&#x26;token=054cb7c1-cf8d-41a8-aac1-40b54637a13e" alt=""><figcaption></figcaption></figure>

<p align="center"><em>
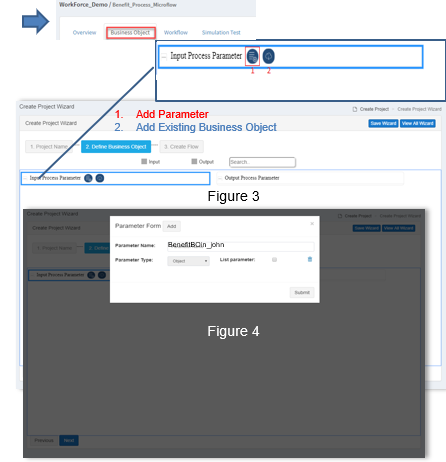
Input BO creation example</em></p>

***

### Step 3: Add Input Business Object Parameters

1. Select your **Input Business Object**
2. Click **Add Parameter**
3. Add the following parameters:
   * `benefit_type` (Type: **String**)
   * `username` (Type: **String**)
4. Click **Submit**
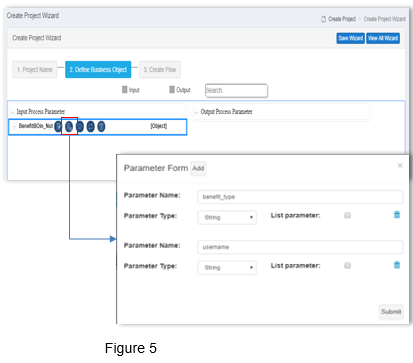
<figure><img src="https://2015371994-files.gitbook.io/~/files/v0/b/gitbook-x-prod.appspot.com/o/spaces%2FMpDjHWFRUtZ5nJcSfVXd%2Fuploads%2FeYJUlsKfVAU7gJT6dWtf%2Fimage.png?alt=media&#x26;token=3a7f3b8a-65c3-4bd3-b1ee-a1edab54b4f7" alt=""><figcaption></figcaption></figure>

<p align="center"><em>Input BO parameters</em></p>

***

### Step 4: Create Output Business Object

1. Select **Output Process Parameter**
2. Click **Add Parameter**
3. Configure:
   * **Parameter Name**: `BenefitBOout_[yourname]`
   * **Parameter Type**: `Object`
   * Mark as **List**
4. Click **Submit**
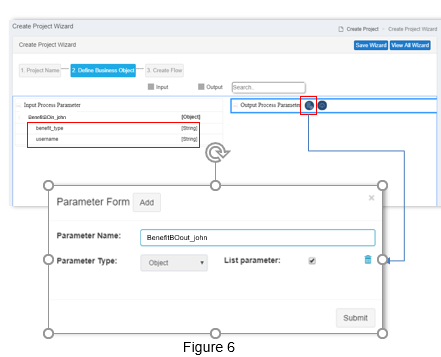
<figure><img src="https://2015371994-files.gitbook.io/~/files/v0/b/gitbook-x-prod.appspot.com/o/spaces%2FMpDjHWFRUtZ5nJcSfVXd%2Fuploads%2Fet606iqBLcWMVyAFWmST%2Fimage.png?alt=media&#x26;token=9c1dfb73-67dd-4e0c-abce-774706f50641" alt=""><figcaption></figcaption></figure>

<p align="center"><em>Output BO creation</em></p>

***

### Step 5: Add Output Business Object Parameters

Add the following parameters under the Output BO:

* `id` (String)
* `travel_date` (Date)
* `project_name` (String)
* `description` (String)
* `amount` (Decimal)
* `status` (String)
* `benefit_type` (String)
* `username` (String)

Click **Submit** once completed.

***

### Step 6: Verify Business Objects

Verify:

* Input BO name and parameters
* Output BO name and parameters
* Correct data types

Click **Next** to proceed.
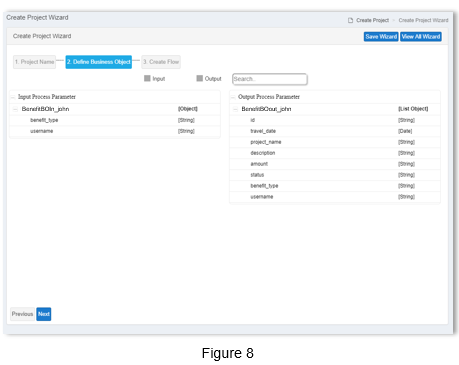
<figure><img src="https://2015371994-files.gitbook.io/~/files/v0/b/gitbook-x-prod.appspot.com/o/spaces%2FMpDjHWFRUtZ5nJcSfVXd%2Fuploads%2FOAgNpP6sDOAooR8C0PzK%2Fimage.png?alt=media&#x26;token=6207fa0a-4716-4621-89cf-72b074e85a7d" alt=""><figcaption></figcaption></figure>

<p align="center"><em>Verification screen</em></p>

***

### Step 7: Design Microflow Workflow

1. Drag and drop the following nodes:
   * **Start**
   * **Database**
   * **End**
2. Connect the nodes:\
   **Start → Database → End**
3. Save your workflow
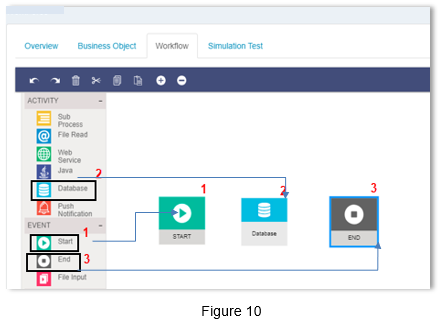
<figure><img src="https://2015371994-files.gitbook.io/~/files/v0/b/gitbook-x-prod.appspot.com/o/spaces%2FMpDjHWFRUtZ5nJcSfVXd%2Fuploads%2FR4NZMSaNR2b7g8QssfOq%2Fimage.png?alt=media&#x26;token=db7b8a52-f279-4f3e-8fcd-9b78d1b3bfa1" alt=""><figcaption></figcaption></figure>

<p align="center"><em>Workflow layout</em></p>

> **FYI**\
> Once data is retrieved, this Microflow will be integrated with the mobile UI created earlier.

***

### Step 8: Configure Database Activity Node

#### BusinessObject Tab

* Select **Input Business Object** (Input ✅)
* Add **Output Business Object** (Output ✅)
* Click **Open Mapping Parameter**
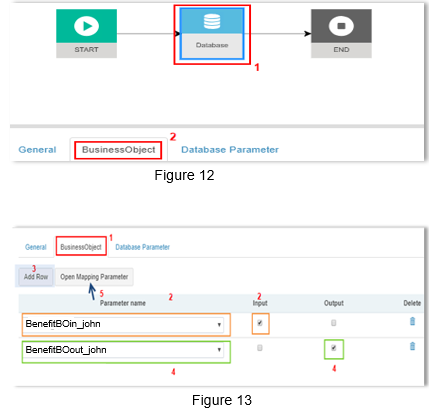
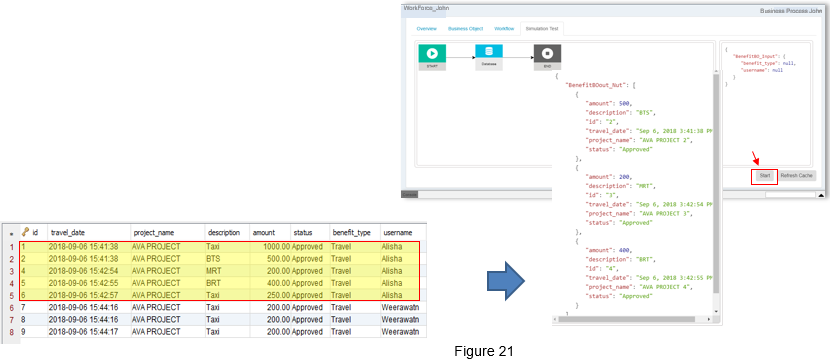
<figure><img src="https://2015371994-files.gitbook.io/~/files/v0/b/gitbook-x-prod.appspot.com/o/spaces%2FMpDjHWFRUtZ5nJcSfVXd%2Fuploads%2Fi47BR44RAvvD7ZDwjBT5%2Fimage.png?alt=media&#x26;token=800f9b54-57e9-4ea4-a1ba-5bf566b03458" alt=""><figcaption></figcaption></figure>

***

### Step 9: Configure Database Parameters

* **Connection Type**: JNDI
* **JNDI Name**: `jdbc/application`
* **Command Type**: Select

SQL:

```
SELECT id, travel_date, project_name, description, amount, status, benefit_type, username
FROM oneweb_benefit
WHERE benefit_type = ? AND username = ?
```

Map:

* Input BO → DatabaseDummyObject
* DatabaseDummyObject → Output BO

***

### Step 10: Simulation Test

1. Open **Simulation Test** tab
2. Enter JSON input:

```
{
    "benefit_type": "Travel",
    "username": "Alisha"
}
```

3. Click **Start**
4. Verify results match database records

<figure><img src="https://2015371994-files.gitbook.io/~/files/v0/b/gitbook-x-prod.appspot.com/o/spaces%2FMpDjHWFRUtZ5nJcSfVXd%2Fuploads%2F6XK3hn22i5jOLwOlg0e9%2Fimage.png?alt=media&#x26;token=3e3919af-d71e-418c-b8e8-489cc2e388c6" alt=""><figcaption></figcaption></figure>

<p align="center"><em>Simulation output</em></p>

***

### Summary

In this section, you have:

* Created a Microflow service
* Defined input and output Business Objects
* Configured a Database Node
* Tested the Microflow using simulation

If the output matches the expected database results, your Microflow service is ready.\
In the next section, you will **integrate this Microflow with the Mobile UI** to display data at runtime.


---

# Agent Instructions: Querying This Documentation

If you need additional information that is not directly available in this page, you can query the documentation dynamically by asking a question.

Perform an HTTP GET request on the current page URL with the `ask` query parameter:

```
GET https://docs.onewebstack.com/tutorials-examples/workforce-app-mobile/create-and-test-microflow-service.md?ask=<question>
```

The question should be specific, self-contained, and written in natural language.
The response will contain a direct answer to the question and relevant excerpts and sources from the documentation.

Use this mechanism when the answer is not explicitly present in the current page, you need clarification or additional context, or you want to retrieve related documentation sections.
