# Integrate Page with Other Systems Using Microflow
Pages in ONEWEB can be integrated with **internal and external systems** such as databases or web services by invoking **Microflows**.\
This enables pages to become **dynamic**, reacting to user actions and displaying real‑time data returned from backend services.
In this section, you will learn how to:
* Call a **Microflow** from a Page
* Pass input values from the Page to the Microflow
* Display the data returned by the Microflow on the Page
Microflow acts as the **service layer**, while the Page handles **presentation and interaction**.
***
### Page → Microflow Integration Flow
Typical execution flow:
1. User interacts with a Page (input or button)
2. Page triggers a Microflow
3. Microflow executes backend logic (DB / REST / SOAP / etc.)
4. Microflow returns data
5. Page updates UI elements dynamically
***
### Page Calls a Microflow (Step‑by‑Step)
#### Step 1: Open Page in Page Designer
1. Go to **Page Designer**
2. Open the Page that you want to make dynamic
***
#### Step 2: Select Input Field to Pass Data
1. Click the **input field** whose value should be sent to the Microflow
***
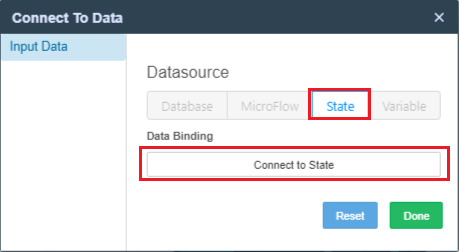
#### Step 3: Connect Input Field to State
Microflow input parameters can only be mapped from **State parameters**, so the input field must first be connected to state.
1. Click **Connect to Data** icon
2. Open the **State** tab
3. Click **Connect to State**
4. Select the required **State parameter**
***
#### Step 4: Select Trigger Element (Button or Container)
1. Click the element that will trigger the Microflow\
(for example, a **Button**)
***
#### Step 5: Configure Microflow Action
1. Click the **Interaction / Data Flow** icon in the left tools panel
2. Under **Action**:
* Click **Add**
* Choose **Event** = `click`
* Select **Microflow**
* Click **Refresh**
* Select:
* **Microflow Project**
* **Microflow Name**
***
#### Step 6: Map Page → Microflow Input
1. Click **Mapping** to open Mapping Window
2. Map **State parameters** to **Microflow input parameters**
3. Click **Save** in the mapping screen
***
#### Optional Enhancements
* Attach **JavaScript hooks** before or after Microflow execution
* Redirect to another page on successful execution
***
### Update Page Data from Microflow Response
#### Step 7: Select Display Element
1. Select the UI component that will display data returned from Microflow
***
#### Step 8: Connect to Microflow Data
1. Click **Connect to Data**
2. Open the **Microflow** tab
3. Click **Connect to Data**
***
#### Step 9: Map Output Field
1. Select Microflow output field
2. Click **Connect**
3. Click **Done**
***
### Runtime Result
The Page is now fully integrated with the Microflow:
* User triggers an event (click / change)
* Page calls the Microflow
* Microflow fetches data from backend system
* Page updates dynamically with returned values
***
### Summary
As a sub‑section of **Integrate Microflow with UX / UI**, this pattern shows how Pages can:
* Invoke Microflows on user interaction
* Pass input values via State parameters
* Receive and render backend data dynamically
* Keep UI logic decoupled from integration logic
This is the **recommended approach** for building dynamic, data‑driven Pages in ONEWEB.
---
# Agent Instructions: Querying This Documentation
If you need additional information that is not directly available in this page, you can query the documentation dynamically by asking a question.
Perform an HTTP GET request on the current page URL with the `ask` query parameter:
```
GET https://docs.onewebstack.com/oneweb-platform-th/building-apps/integrations/develop-integration-with-oneweb-microflow/integrate-microflow-with-ux-ui/integrate-page-with-other-systems-using-microflow.md?ask=
```
The question should be specific, self-contained, and written in natural language.
The response will contain a direct answer to the question and relevant excerpts and sources from the documentation.
Use this mechanism when the answer is not explicitly present in the current page, you need clarification or additional context, or you want to retrieve related documentation sections.