# Create Project Wizard
The **Create Project Wizard** provides a **guided, step‑by‑step workflow** for creating an application and its associated business process.\
The wizard ensures that all essential components are defined before process design begins.
The wizard consists of **five main steps**.
***
### Step 1: Application Name
In this step, define the basic information of the application.
1. Enter the **Application Name**
2. (Optional) Enter a description
3. Click **Next** to continue
#### Application Properties
| Property | Mandatory | Default | Description |
| ---------------- | --------- | ---------------- | ------------------------------ |
| Application Name | Yes | — | Name of the application |
| Application ID | Yes | System‑generated | Unique identifier |
| Description | No | — | Description of the application |
***
### Step 2: Define Business Object
This step defines the **input and output data structures** used by the process.
Users can:
* **Add an existing Business Object (BO)** 
* **Create a new Business Object** 
Define BO details in the parameter dialog:
Add additional parameters as required:
Click **Next** to continue or **Previous** to return.
> **Note**\
> At any step, click **Save Wizard** to save progress. You can resume later via **View All Wizard**.
***
### Step 3: Create Work Party
Define the **Work Parties (roles)** involved in the process.
Users can:
* Click **Add** to insert a new Work Party
* Click **Remove** to delete an entry
* Click **Next** after completing the list
#### Work Party Properties
| Property | Mandatory | Default | Description |
| --------------- | --------- | --------- | ------------------------------------- |
| Work Party Name | Yes | — | Name of the work party |
| Type | Yes | User Role | Currently only User Role is supported |
| Work Party Lead | No | — | Lead of the work party |
***
### Step 4: Create User / Member
Define **members** belonging to each Work Party.
Users can:
* Click **Add** to create a new member
* Use **Lookup existing member** to select from existing users
* Click **Remove** to delete members
#### Member Properties
| Property | Mandatory | Default | Description |
| ----------- | --------- | ------- | ------------------- |
| Member ID | Yes | — | Member identifier |
| Member Name | Yes | — | Name of the member |
| Member Type | Yes | USER | USER or ROLE |
| Work Party | Yes | — | Assigned work party |
***
### Step 5: Create Process
This is the final step where the **initial process definition** is configured.
Users can:
* Define the process name and type
* Optionally create **Human Tasks (Activities)**
* Assign responsible Work Parties
* Provide activity descriptions
* Click **Add** to create multiple Human Tasks
* Click **Finish** to proceed
#### Process Properties
| Property | Mandatory | Default | Description |
| ---------------------- | --------- | ------- | -------------------- |
| Process Name | Yes | — | Name of the process |
| Process Type | Yes | Private | Private or Shareable |
| Activity | No | — | Human task name |
| Work Party Responsible | No | — | Assigned work party |
| Description | No | — | Activity description |
***
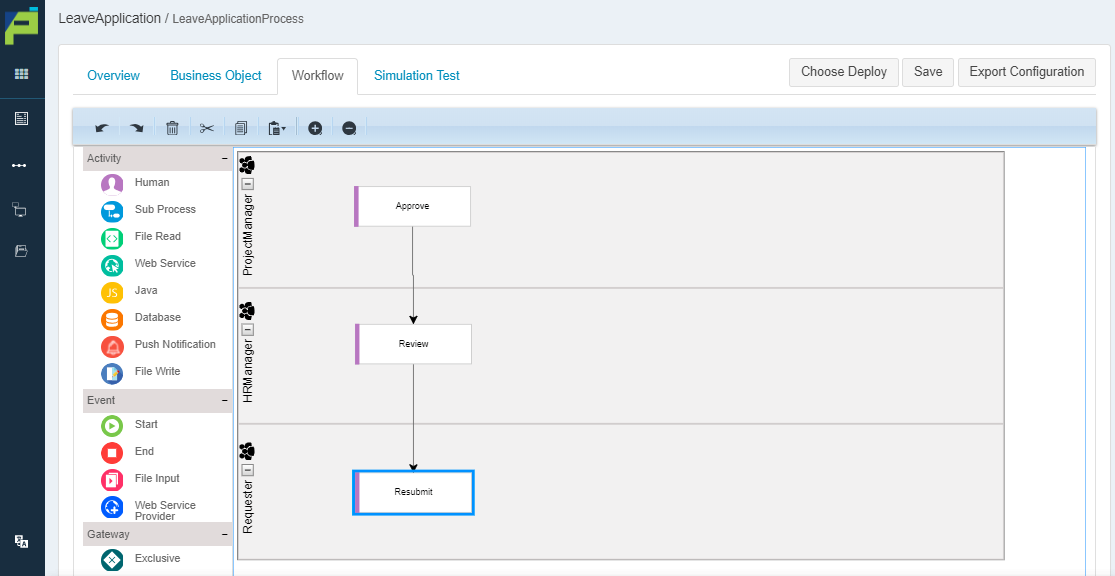
### Process Template Diagram
After clicking **Finish**, the system opens the **Create Flow** page and automatically generates a **process stub** based on the entered information.
Users may also choose to skip Activity and Work Party details and start with an **empty process diagram**.
***
### Summary
The **Create Project Wizard** provides a complete and structured approach to application and process creation.
Key benefits:
* Step‑by‑step guided configuration
* Ensures all required components are defined
* Suitable for new users and production‑ready processes
* Automatically prepares the BPMN process diagram
For most users, especially those with clearly defined requirements, **Create Project Wizard** is the **recommended approach** for building business processes in ONEWEB.
---
# Agent Instructions: Querying This Documentation
If you need additional information that is not directly available in this page, you can query the documentation dynamically by asking a question.
Perform an HTTP GET request on the current page URL with the `ask` query parameter:
```
GET https://docs.onewebstack.com/designer-reference/process-designer/create-new-process/create-project-wizard.md?ask=
```
The question should be specific, self-contained, and written in natural language.
The response will contain a direct answer to the question and relevant excerpts and sources from the documentation.
Use this mechanism when the answer is not explicitly present in the current page, you need clarification or additional context, or you want to retrieve related documentation sections.