# Step by Step: Create Your First Smart Form

This section explains the **step‑by‑step process** to create your first Smart Form on ONEWEB, using a **Loan Application** example.\
The tutorial demonstrates how **Entity, Tabs, Modules, Fields, and Buttons** work together to form a complete Smart Form.

***

### Example Scenario: Loan Application

We will create a Smart Form named **Application**, consisting of:

* **Main Tab:** Application
* **Child Tab:** Customer Information

Example target screens:

<figure><img src="https://2015371994-files.gitbook.io/~/files/v0/b/gitbook-x-prod.appspot.com/o/spaces%2FMpDjHWFRUtZ5nJcSfVXd%2Fuploads%2FakVBD1NxAh3ucSy5fXO2%2F0?alt=media" alt=""><figcaption></figcaption></figure>

***

### Step 1: Create and Open the Entity

1. Create a new **Entity**
2. Open the Entity property window (Edit icon)

<figure><img src="https://2015371994-files.gitbook.io/~/files/v0/b/gitbook-x-prod.appspot.com/o/spaces%2FMpDjHWFRUtZ5nJcSfVXd%2Fuploads%2FN7Mo0a79hDmKJaQ2lDAU%2F1?alt=media" alt=""><figcaption></figcaption></figure>

3. Enter **Entity Name** as `Application`
4. Click **OK**

<figure><img src="https://2015371994-files.gitbook.io/~/files/v0/b/gitbook-x-prod.appspot.com/o/spaces%2FMpDjHWFRUtZ5nJcSfVXd%2Fuploads%2FdOMmUVTWkUvWo05RJ488%2F2?alt=media" alt=""><figcaption></figcaption></figure>

***

### Step 2: Configure Main Tab (2‑Layer Tab – Application)

1. Drag **2‑Layer Tab** into the top (General Tab) area
2. Set:
   * **Title:** Application
   * **Template:** 1 Column
3. Click **Add**

<figure><img src="https://2015371994-files.gitbook.io/~/files/v0/b/gitbook-x-prod.appspot.com/o/spaces%2FMpDjHWFRUtZ5nJcSfVXd%2Fuploads%2FSPnLyojXERd1R6HCK5BP%2F3?alt=media" alt=""><figcaption></figcaption></figure>

4. Save the Entity.

<figure><img src="https://2015371994-files.gitbook.io/~/files/v0/b/gitbook-x-prod.appspot.com/o/spaces%2FMpDjHWFRUtZ5nJcSfVXd%2Fuploads%2FbamYXJ77EXAkDPLBAdo4%2F4?alt=media" alt=""><figcaption></figcaption></figure>

Resulting structure:

<figure><img src="https://2015371994-files.gitbook.io/~/files/v0/b/gitbook-x-prod.appspot.com/o/spaces%2FMpDjHWFRUtZ5nJcSfVXd%2Fuploads%2F7EMOAHSHVVxdXEqRU08x%2F5?alt=media" alt=""><figcaption></figcaption></figure>

***

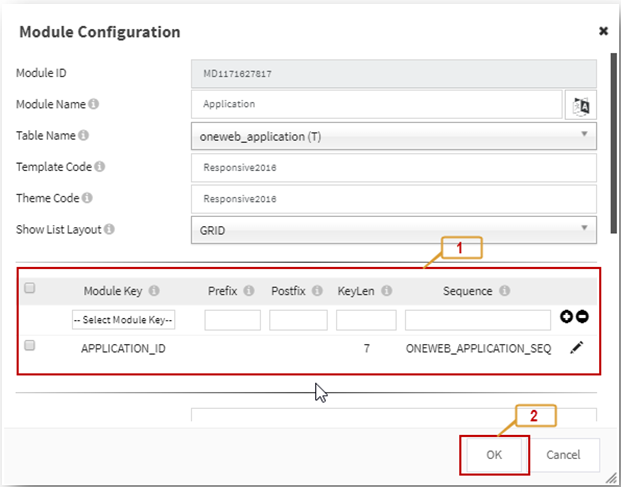
### Step 3: Create Main Module (1‑1 Module)

1. Drag **1‑1 Module** under the Application tab
2. Open **Layout Properties**&#x20;
3. Choose **2 Columns**
4. Add required rows

<figure><img src="https://2015371994-files.gitbook.io/~/files/v0/b/gitbook-x-prod.appspot.com/o/spaces%2FMpDjHWFRUtZ5nJcSfVXd%2Fuploads%2FdOmjowH2PSg1MSF2uzLw%2F8?alt=media" alt=""><figcaption></figcaption></figure>

5. Configure Module:

* **Module Name:** Application
* **Table:** `oneweb_application(T)`

<figure><img src="https://2015371994-files.gitbook.io/~/files/v0/b/gitbook-x-prod.appspot.com/o/spaces%2FMpDjHWFRUtZ5nJcSfVXd%2Fuploads%2FvLp498J0npT9V2K0N1CA%2F10?alt=media" alt=""><figcaption></figcaption></figure>

***

### Step 4: Configure Fields (Main Module)

#### 4.1 Hidden Field (Primary Key)

* **FIELD\_ID:** `APPLICATION_ID`
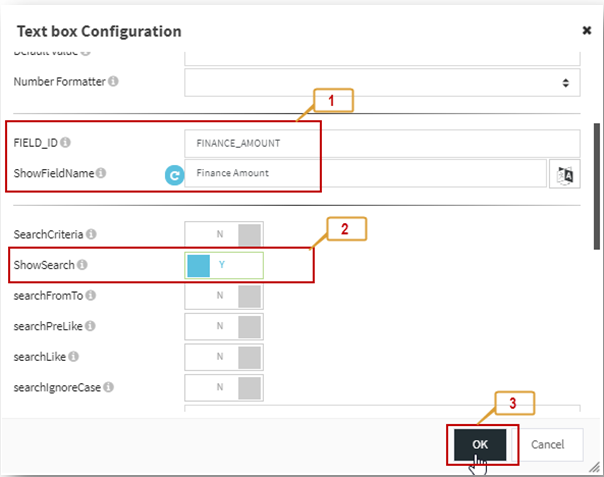
<figure><img src="https://2015371994-files.gitbook.io/~/files/v0/b/gitbook-x-prod.appspot.com/o/spaces%2FMpDjHWFRUtZ5nJcSfVXd%2Fuploads%2FnRIAV0nr1o3D5ZOPWwhc%2F14?alt=media" alt=""><figcaption></figcaption></figure>

***

#### 4.2 Example Fields

**Date Field (Application Date)**

<figure><img src="https://2015371994-files.gitbook.io/~/files/v0/b/gitbook-x-prod.appspot.com/o/spaces%2FMpDjHWFRUtZ5nJcSfVXd%2Fuploads%2FZRDrtyaDyNrnataElLWs%2F17?alt=media" alt=""><figcaption></figcaption></figure>

**Dynamic List (Channel)**

<figure><img src="https://2015371994-files.gitbook.io/~/files/v0/b/gitbook-x-prod.appspot.com/o/spaces%2FMpDjHWFRUtZ5nJcSfVXd%2Fuploads%2FH4HP8VDv6mMS616f91xR%2F19?alt=media" alt=""><figcaption></figcaption></figure>

**Finance Amount**

<figure><img src="https://2015371994-files.gitbook.io/~/files/v0/b/gitbook-x-prod.appspot.com/o/spaces%2FMpDjHWFRUtZ5nJcSfVXd%2Fuploads%2FRyjnfSD9CvAJe8U8Ulgg%2Fimage.png?alt=media" alt=""><figcaption></figcaption></figure>

***

### Step 5: Set Primary Key (Main Module)

<figure><img src="https://2015371994-files.gitbook.io/~/files/v0/b/gitbook-x-prod.appspot.com/o/spaces%2FMpDjHWFRUtZ5nJcSfVXd%2Fuploads%2FOkbaL4WOcNuroZJQ5CNK%2Fimage.png?alt=media" alt=""><figcaption></figcaption></figure>

***

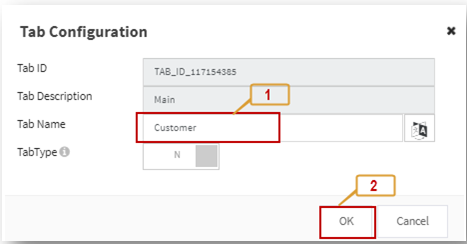
### Step 6: Add Child Tab (Customer)

<figure><img src="https://2015371994-files.gitbook.io/~/files/v0/b/gitbook-x-prod.appspot.com/o/spaces%2FMpDjHWFRUtZ5nJcSfVXd%2Fuploads%2FvfspCDdVyAhvLFCFKzNR%2Fimage.png?alt=media" alt=""><figcaption></figcaption></figure>

***

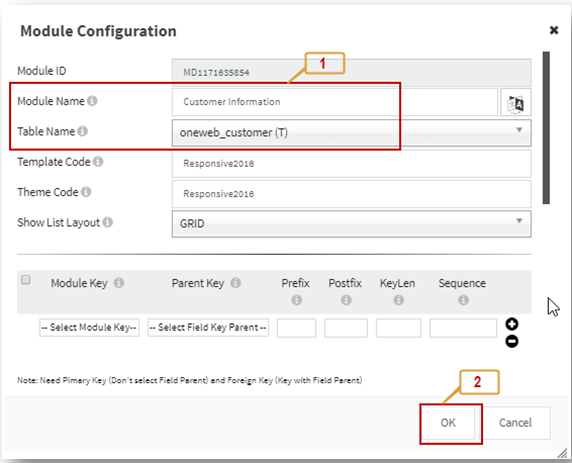
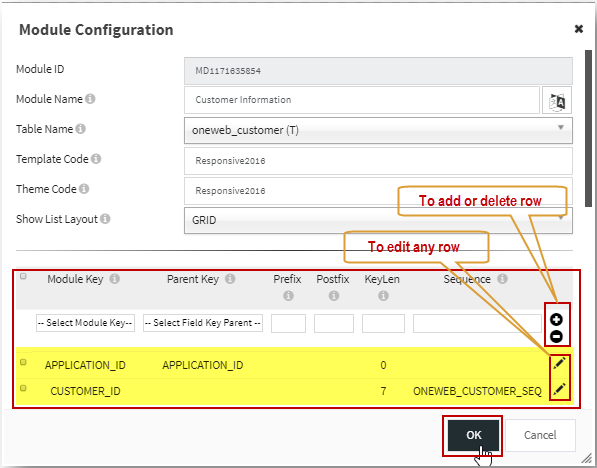
### Step 7: Child Module (1‑Many – Customer Info)

<figure><img src="https://2015371994-files.gitbook.io/~/files/v0/b/gitbook-x-prod.appspot.com/o/spaces%2FMpDjHWFRUtZ5nJcSfVXd%2Fuploads%2FNTWVq0ehcLGNFbJlanNO%2Fimage.png?alt=media" alt=""><figcaption></figcaption></figure>

***

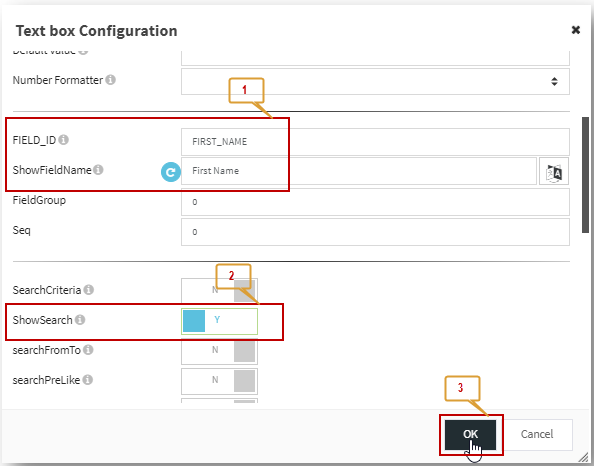
### Step 8: Child Fields (Customer)

Example – First Name:

<figure><img src="https://2015371994-files.gitbook.io/~/files/v0/b/gitbook-x-prod.appspot.com/o/spaces%2FMpDjHWFRUtZ5nJcSfVXd%2Fuploads%2FyvsEMA9yLHf5gEVjZkF5%2Fimage.png?alt=media" alt=""><figcaption></figcaption></figure>

***

### Step 9: Set Child Primary & Parent Key

<figure><img src="https://2015371994-files.gitbook.io/~/files/v0/b/gitbook-x-prod.appspot.com/o/spaces%2FMpDjHWFRUtZ5nJcSfVXd%2Fuploads%2FWnXqhNyqIcmnA0mS3G7j%2Fimage.png?alt=media" alt=""><figcaption></figcaption></figure>

***

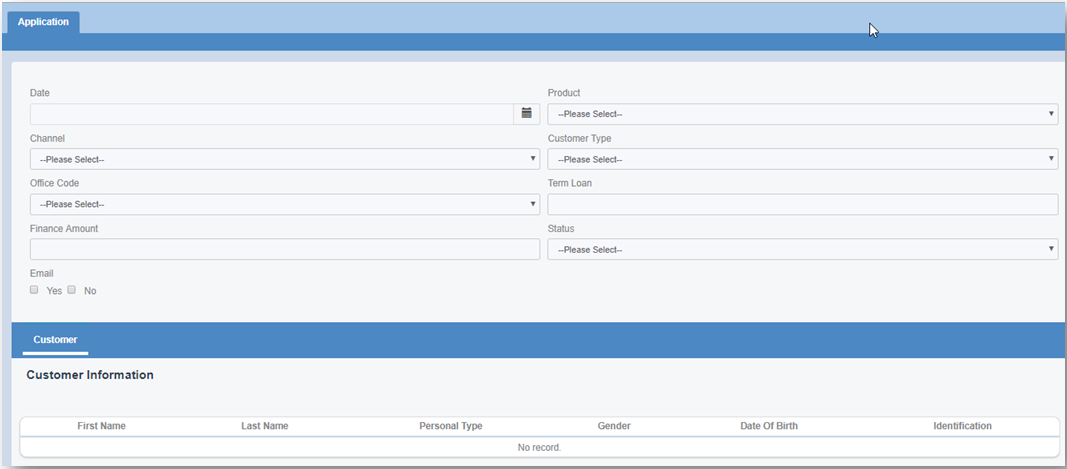
### Step 10: Preview Smart Form

<figure><img src="https://2015371994-files.gitbook.io/~/files/v0/b/gitbook-x-prod.appspot.com/o/spaces%2FMpDjHWFRUtZ5nJcSfVXd%2Fuploads%2Fy4N3FDy1nyELSQktyzI1%2Fimage.png?alt=media" alt=""><figcaption></figcaption></figure>

Preview result:

<figure><img src="https://2015371994-files.gitbook.io/~/files/v0/b/gitbook-x-prod.appspot.com/o/spaces%2FMpDjHWFRUtZ5nJcSfVXd%2Fuploads%2FcJuymu6xsIkQkSzTX6qX%2Fimage.png?alt=media" alt=""><figcaption></figcaption></figure>

***

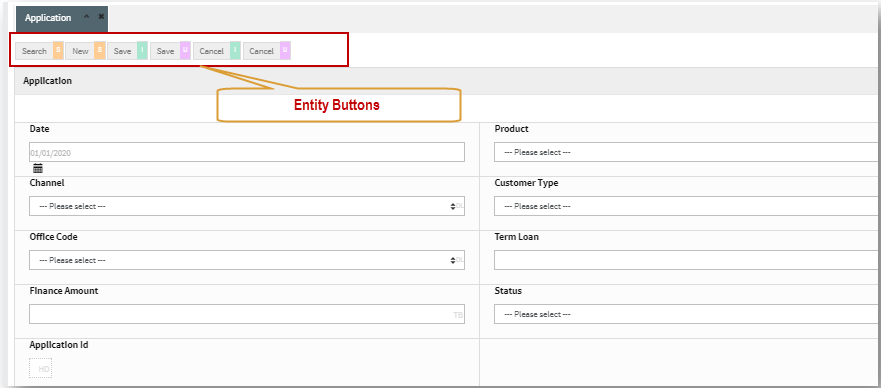
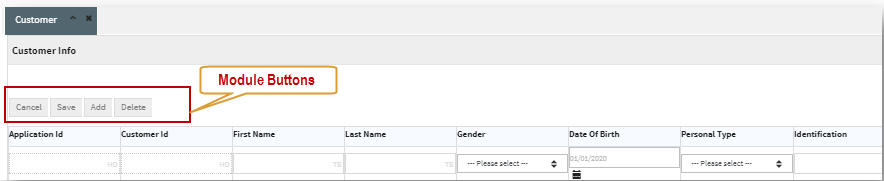
### Step 11: Configure Buttons

#### Entity Buttons

<figure><img src="https://2015371994-files.gitbook.io/~/files/v0/b/gitbook-x-prod.appspot.com/o/spaces%2FMpDjHWFRUtZ5nJcSfVXd%2Fuploads%2FBCc8cwmkK0m2nzyc0fnE%2Fimage.png?alt=media" alt=""><figcaption></figcaption></figure>

#### Module Buttons

<figure><img src="https://2015371994-files.gitbook.io/~/files/v0/b/gitbook-x-prod.appspot.com/o/spaces%2FMpDjHWFRUtZ5nJcSfVXd%2Fuploads%2F3DJFKfeO3MXSTAm4t9iN%2Fimage.png?alt=media" alt=""><figcaption></figcaption></figure>

{% hint style="info" %}
**Congratulations!**\
You have successfully created your first Smart Form on ONEWEB with full Parent–Child structure.
{% endhint %}


---

# Agent Instructions: Querying This Documentation

If you need additional information that is not directly available in this page, you can query the documentation dynamically by asking a question.

Perform an HTTP GET request on the current page URL with the `ask` query parameter:

```
GET https://docs.onewebstack.com/building-apps/ui-page-designer/ux-ui-components/smart-forms/create-your-first-smart-form/step-by-step-create-your-first-smart-form.md?ask=<question>
```

The question should be specific, self-contained, and written in natural language.
The response will contain a direct answer to the question and relevant excerpts and sources from the documentation.

Use this mechanism when the answer is not explicitly present in the current page, you need clarification or additional context, or you want to retrieve related documentation sections.
