# Configure the Flow

In this section, we will create the **actual Microflow logic** using the **Flow Diagram**.\
This example demonstrates how to design a simple Microflow that retrieves data from a database and returns the result as a service response.

***

### Step 1: Add Start Event

1. Open **Microflow Designer**
2. Drag the **Start** node from the **EVENT** tab
3. Drop it onto the design canvas

<figure><img src="https://2015371994-files.gitbook.io/~/files/v0/b/gitbook-x-prod.appspot.com/o/spaces%2FMpDjHWFRUtZ5nJcSfVXd%2Fuploads%2FMYp6wl7efc2gQInCRqli%2Fimage.png?alt=media&#x26;token=58b91aef-f67c-4d8f-ac9a-36df3f0b4d85" alt=""><figcaption></figcaption></figure>

The Start node marks the entry point of the Microflow.

***

### Step 2: Add Database Task

1. Drag the **Database** node from the **ACTIVITY** tab
2. Drop it next to the Start node

<figure><img src="https://2015371994-files.gitbook.io/~/files/v0/b/gitbook-x-prod.appspot.com/o/spaces%2FMpDjHWFRUtZ5nJcSfVXd%2Fuploads%2Fd73FAeRB0go6TmEASGdB%2Fimage.png?alt=media&#x26;token=9d8acb14-0350-4372-9eb3-d94f932c085c" alt=""><figcaption></figcaption></figure>

***

### Step 3: Configure Database Task

#### 3.1 General Tab

1. Double‑click the **Database** node
2. In the **General** tab, enter the name:

```
RetrieveUserBenefits
```

<figure><img src="https://2015371994-files.gitbook.io/~/files/v0/b/gitbook-x-prod.appspot.com/o/spaces%2FMpDjHWFRUtZ5nJcSfVXd%2Fuploads%2F6Y2F9Ccrb1GQTtnSLICH%2Fimage.png?alt=media&#x26;token=772b2b24-2d5b-43f0-a954-011598df6309" alt=""><figcaption></figcaption></figure>

***

#### 3.2 Business Object Tab

1. Go to the **Business Object** tab
2. Click **Add Row**
3. Configure:
   * **BenefitBO** → Input
   * **BenefitBOout\_Avalant** → Output

<figure><img src="https://2015371994-files.gitbook.io/~/files/v0/b/gitbook-x-prod.appspot.com/o/spaces%2FMpDjHWFRUtZ5nJcSfVXd%2Fuploads%2Fg6taVo4bhFPBsaNdDrVI%2Fimage.png?alt=media&#x26;token=fbb255b1-76ab-41aa-a188-70c61b8b4180" alt=""><figcaption></figcaption></figure>

> **Note**\
> From **version 4.0.0.19**, parameter mapping is performed automatically when input and output use the same Business Object.\
> Manual mapping is required only when using **different Business Objects**.

***

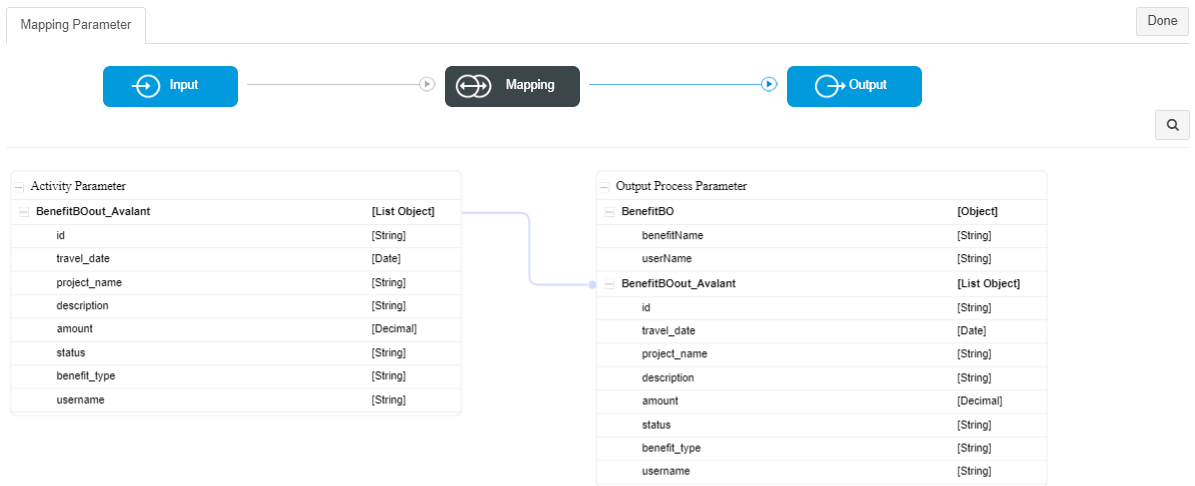
#### 3.3 Map Business Object Parameters

1. Click **Open Mapping Parameter**
2. Map:
   * Input → Mapping
   * Mapping → Output
3. Click **Done**

<figure><img src="https://2015371994-files.gitbook.io/~/files/v0/b/gitbook-x-prod.appspot.com/o/spaces%2FMpDjHWFRUtZ5nJcSfVXd%2Fuploads%2FtQhagDEmZI5JinReFp5X%2Fimage.png?alt=media&#x26;token=16e19a03-622e-4407-a5f2-89f04ebd9e66" alt=""><figcaption></figcaption></figure>

<figure><img src="https://2015371994-files.gitbook.io/~/files/v0/b/gitbook-x-prod.appspot.com/o/spaces%2FMpDjHWFRUtZ5nJcSfVXd%2Fuploads%2FiLEnBeIe4c9WdDvhiRhc%2Fimage.png?alt=media&#x26;token=a37255bd-b211-4948-81b2-379eb59760c2" alt=""><figcaption></figcaption></figure>

***

#### 3.4 Database Parameter Tab (SQL Configuration)

1. Open **Database Parameter**
2. Set:
   * **Connection Type**: `JNDI`
   * **JNDI Name**: `jdbc/application`
   * **Command Type**: `SELECT`
   * **Command**:

```
SELECT id, travel_date, project_name, description,
    amount, status, benefit_type, username
FROM oneweb_benefit
WHERE benefit_type = ?
AND username = ?
```

<figure><img src="https://2015371994-files.gitbook.io/~/files/v0/b/gitbook-x-prod.appspot.com/o/spaces%2FMpDjHWFRUtZ5nJcSfVXd%2Fuploads%2Fo3P41zmEv0tKlUz6qtUa%2Fimage.png?alt=media&#x26;token=254ac8ec-b720-4aaa-889b-eb439f0792f5" alt=""><figcaption></figcaption></figure>

***

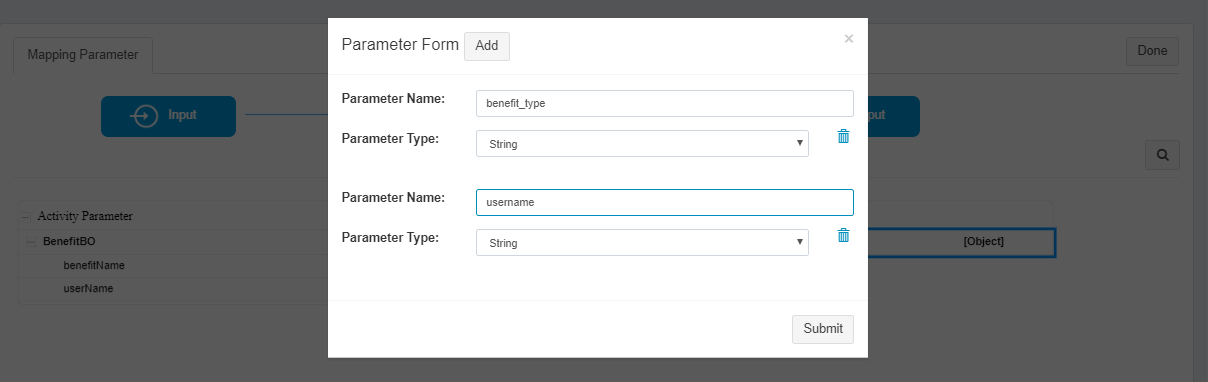
#### 3.5 Map SQL Input Parameters

1. Click **Open Mapping Parameter**
2. Add parameters:
   * `benefit_type`
   * `username`
3. Link them from input BO

<figure><img src="https://2015371994-files.gitbook.io/~/files/v0/b/gitbook-x-prod.appspot.com/o/spaces%2FMpDjHWFRUtZ5nJcSfVXd%2Fuploads%2FowMKKsSrP8TNHvjHr4LC%2Fimage.png?alt=media&#x26;token=bde25d85-558c-4ca1-99d8-dad58e986276" alt=""><figcaption></figcaption></figure>

<figure><img src="https://2015371994-files.gitbook.io/~/files/v0/b/gitbook-x-prod.appspot.com/o/spaces%2FMpDjHWFRUtZ5nJcSfVXd%2Fuploads%2FiAkXfkl3VGXho17hQYD5%2Fimage.png?alt=media&#x26;token=687c437c-2309-4ee8-ab5b-560ee7b6c4ff" alt=""><figcaption></figcaption></figure>

<figure><img src="https://2015371994-files.gitbook.io/~/files/v0/b/gitbook-x-prod.appspot.com/o/spaces%2FMpDjHWFRUtZ5nJcSfVXd%2Fuploads%2FDFQMkmK4ZjqfCZMH1yFy%2Fimage.png?alt=media&#x26;token=c971dcda-54aa-42dc-b1a4-cd764404d5c6" alt=""><figcaption></figcaption></figure>

***

#### 3.6 Map SQL Output Parameters

1. Add output parameters from result set
2. Map them to output Business Object
3. Click **Done**

<figure><img src="https://2015371994-files.gitbook.io/~/files/v0/b/gitbook-x-prod.appspot.com/o/spaces%2FMpDjHWFRUtZ5nJcSfVXd%2Fuploads%2Fn5EcUEg7kyPtRuSKg1uW%2Fimage.png?alt=media&#x26;token=69970917-2ff2-4cde-b3cb-585893afc723" alt=""><figcaption></figcaption></figure>

<figure><img src="https://2015371994-files.gitbook.io/~/files/v0/b/gitbook-x-prod.appspot.com/o/spaces%2FMpDjHWFRUtZ5nJcSfVXd%2Fuploads%2FFxdYrJ150Cs4VkrMVe2M%2Fimage.png?alt=media&#x26;token=e61e2779-0fa9-495a-b273-94da9e4e0432" alt=""><figcaption></figcaption></figure>

<figure><img src="https://2015371994-files.gitbook.io/~/files/v0/b/gitbook-x-prod.appspot.com/o/spaces%2FMpDjHWFRUtZ5nJcSfVXd%2Fuploads%2F503x5VvYtBichEBLv1wf%2Fimage.png?alt=media&#x26;token=97837103-0ea4-459b-a7bc-8f675e42dce1" alt=""><figcaption></figcaption></figure>

***

### Step 4: Add End Event

1. Drag the **End** node from the **EVENT** tab
2. Place it after the Database node

<figure><img src="https://2015371994-files.gitbook.io/~/files/v0/b/gitbook-x-prod.appspot.com/o/spaces%2FMpDjHWFRUtZ5nJcSfVXd%2Fuploads%2FLZHlI1hA5qEw5Bx1ezbv%2Fimage.png?alt=media&#x26;token=b6dc00e7-c890-46d3-813c-b860b27ef35a" alt=""><figcaption></figcaption></figure>

***

### Step 5: Connect and Save

1. Connect **Start → Database → End**
2. Click **Save**

<figure><img src="https://2015371994-files.gitbook.io/~/files/v0/b/gitbook-x-prod.appspot.com/o/spaces%2FMpDjHWFRUtZ5nJcSfVXd%2Fuploads%2FV6FU78nm7CtWmz31xxEj%2Fimage.png?alt=media&#x26;token=51c60790-4699-47c4-834c-ae400490a730" alt=""><figcaption></figcaption></figure>

***

### Validate the Microflow

Use the **Validate** option to ensure:

* Nodes are connected correctly
* Parameters are mapped
* Configuration is complete

<figure><img src="https://2015371994-files.gitbook.io/~/files/v0/b/gitbook-x-prod.appspot.com/o/spaces%2FMpDjHWFRUtZ5nJcSfVXd%2Fuploads%2FXg6SpULz9pWfIrSVDXNc%2Fimage.png?alt=media&#x26;token=e27088c8-5a59-4d62-bf7e-4d343b7cbdfd" alt=""><figcaption></figcaption></figure>

***

### Result

You now have your **first Microflow service** fully configured and ready for execution.\
This Microflow:

* Accepts input parameters
* Queries the database
* Returns structured output
* Is reusable as an integration service


---

# Agent Instructions: Querying This Documentation

If you need additional information that is not directly available in this page, you can query the documentation dynamically by asking a question.

Perform an HTTP GET request on the current page URL with the `ask` query parameter:

```
GET https://docs.onewebstack.com/building-apps/integrations/develop-integration-with-oneweb-microflow/start-with-microflow-in-oneweb/configure-the-flow.md?ask=<question>
```

The question should be specific, self-contained, and written in natural language.
The response will contain a direct answer to the question and relevant excerpts and sources from the documentation.

Use this mechanism when the answer is not explicitly present in the current page, you need clarification or additional context, or you want to retrieve related documentation sections.
